Rifled Wooden Slugs: How to Make Them
Posted: Tue Oct 19, 2010 12:45 pm
Hey all.
I thought I would share how to make some inexpensive ammo that seems to work pretty well from my initial tests.
This will require some wood working skill and some specialized tools, but even if you are not a cabinet maker you can still get some useful ideas from this tutorial. The idea is simple. Make 3 disks from some 3/4" thick material and glue them together to form a projectile. I took it a few steps farther by routing a taper on the front of the projectile and cutting rifling into the sides. I also used bolts and washers to make the projectiles more durable, but that is optional. And finally I painted them to make them more visible and easier to recover.
Tools I used are: Band Saw, Table Top 6" Sander, Router with 1/2" 2-flute Carbide Blades, Bottom-bearing, and a specialized Router Bit with the "Bullet" profile. I also made use of my Drill Press, but any drill will do, and finally I used my Compound Miter to make the rifling grooves. I suggest using a shop vac to collect dust when working as the stuff is semi-toxic and smells bad.
About the cheapest hardest material is melamine, that ubiquitous white shelving material made from wood chips, glue, and sand. The stuff is semi-toxic so use dust collection and/or wear a mask along with the usual eye and ear protection when working with this foul smelling wood-related product.
First thing you need to do is make a pattern. You can use paper or (what I did) find something that is already close and build out the diameter with masking tape until it fits snug in the bore of your cannon. You will use this pattern just to make your melamine template. So take your time and get it just right.
Rubber sanding drums are just about perfect for this and also can be used as a starter router template to get that first melamine template made quickly. I found a 1.5" Sanding drum with some masking tape wrapped around it was perfect. Just trace around your pattern onto the melamine, cut that out leaving about 1/16" to an 1/8" extra to trim with the router. I used strong Double-sided tape to attach the rough cut circle to the sanding drum and was able to route the melamine with ease using a table mounted router and flush trimming bit.
You will probably need to dial the melamine disk in a bit so it slides perfectly into the bore of your cannon. I used the 6" sander to do that. Once it's just right use this template to trace, cut and route at least one disk per slug you want to make. Now it gets faster. You only need to rough cut the 2 remaining disks for each slug. I used the band saw. Leave less than an 1/8" for the router to remove for safety as the parts are small and you will need to control them against the blade of the router bit.
Using super glue just dab three dots on one of the rough cut disks and press one of the perfect disks onto that. Now glue a rough cut disk to the other side of the perfect disk. Use the perfect disk to route each rough disk. This part goes really fast. It took me about 30 seconds per slug to glue and route the pieces.
At this point you have a projectile, but there are a few more steps to make it have somewhat better ballistics and durability.
The router bit I use for the bullet shape of the projectile is not one you can find at the local store. You will have to order it. But a simple Round-over bit, or chamfering bit will work too. The idea is to make the slug somewhat aerodynamic, so easing the front edge and tapering the side are what's next.
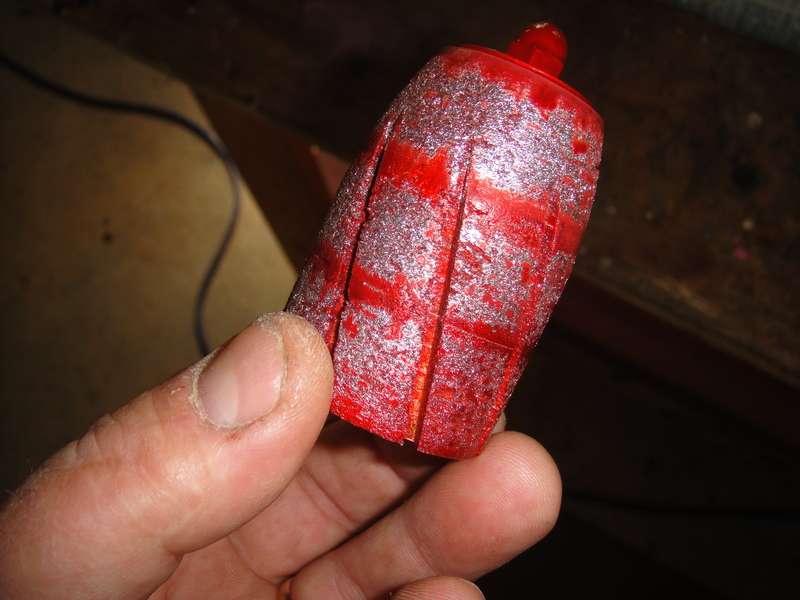
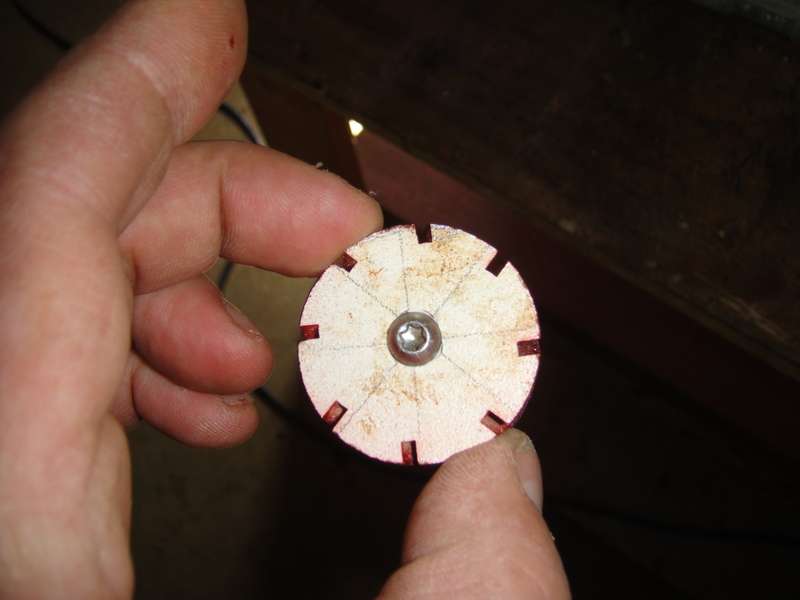
Once you have the desired profile routed into the bullet you may want to add rifling grooves. To do this safely on a power miter you will need to mark the center of the slug and screw the nose to a piece of scrap you can clamp to the saw fence. By marking the butt of the slug (I made 4 lines to guide me) you can rotate it one octant at a time and get the slots evenly distributed. I set the depth of the saw to make an 1/8" deep groove and I turned the blade about 17 degrees to get the "twist" that makes the slug spin.
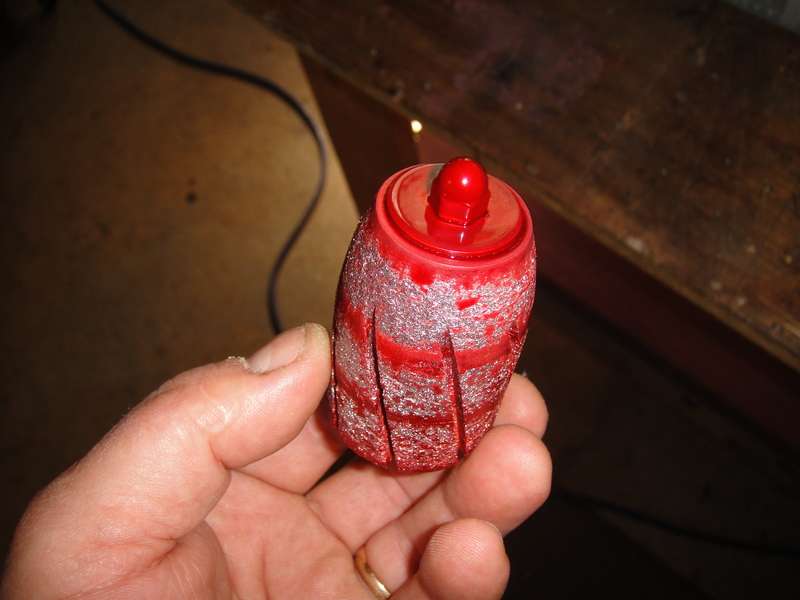
Once you have made the 8 grooves (or however many you want) around the circumference you can drill the center and sandwich the front and back with some hardware. I used a fender washer on the nose of the slug, a 2.5" long machine screw and an acorn nut. I've made some with no hardware, a self tapping screw and washer on the nose, etc. It's all about finding the right weight, balance, durability for your application.
Here are some pics of the slugs. I am uploading vids that I will add to this post later on.


Let me know what you think and if you have any ideas about ways to improve these that would be great...I'll be glad to try them out.
EDIT: Testing the slug Vid
[youtube][/youtube]
I thought I would share how to make some inexpensive ammo that seems to work pretty well from my initial tests.
This will require some wood working skill and some specialized tools, but even if you are not a cabinet maker you can still get some useful ideas from this tutorial. The idea is simple. Make 3 disks from some 3/4" thick material and glue them together to form a projectile. I took it a few steps farther by routing a taper on the front of the projectile and cutting rifling into the sides. I also used bolts and washers to make the projectiles more durable, but that is optional. And finally I painted them to make them more visible and easier to recover.
Tools I used are: Band Saw, Table Top 6" Sander, Router with 1/2" 2-flute Carbide Blades, Bottom-bearing, and a specialized Router Bit with the "Bullet" profile. I also made use of my Drill Press, but any drill will do, and finally I used my Compound Miter to make the rifling grooves. I suggest using a shop vac to collect dust when working as the stuff is semi-toxic and smells bad.
About the cheapest hardest material is melamine, that ubiquitous white shelving material made from wood chips, glue, and sand. The stuff is semi-toxic so use dust collection and/or wear a mask along with the usual eye and ear protection when working with this foul smelling wood-related product.
First thing you need to do is make a pattern. You can use paper or (what I did) find something that is already close and build out the diameter with masking tape until it fits snug in the bore of your cannon. You will use this pattern just to make your melamine template. So take your time and get it just right.
Rubber sanding drums are just about perfect for this and also can be used as a starter router template to get that first melamine template made quickly. I found a 1.5" Sanding drum with some masking tape wrapped around it was perfect. Just trace around your pattern onto the melamine, cut that out leaving about 1/16" to an 1/8" extra to trim with the router. I used strong Double-sided tape to attach the rough cut circle to the sanding drum and was able to route the melamine with ease using a table mounted router and flush trimming bit.
You will probably need to dial the melamine disk in a bit so it slides perfectly into the bore of your cannon. I used the 6" sander to do that. Once it's just right use this template to trace, cut and route at least one disk per slug you want to make. Now it gets faster. You only need to rough cut the 2 remaining disks for each slug. I used the band saw. Leave less than an 1/8" for the router to remove for safety as the parts are small and you will need to control them against the blade of the router bit.
Using super glue just dab three dots on one of the rough cut disks and press one of the perfect disks onto that. Now glue a rough cut disk to the other side of the perfect disk. Use the perfect disk to route each rough disk. This part goes really fast. It took me about 30 seconds per slug to glue and route the pieces.
At this point you have a projectile, but there are a few more steps to make it have somewhat better ballistics and durability.
The router bit I use for the bullet shape of the projectile is not one you can find at the local store. You will have to order it. But a simple Round-over bit, or chamfering bit will work too. The idea is to make the slug somewhat aerodynamic, so easing the front edge and tapering the side are what's next.
Once you have the desired profile routed into the bullet you may want to add rifling grooves. To do this safely on a power miter you will need to mark the center of the slug and screw the nose to a piece of scrap you can clamp to the saw fence. By marking the butt of the slug (I made 4 lines to guide me) you can rotate it one octant at a time and get the slots evenly distributed. I set the depth of the saw to make an 1/8" deep groove and I turned the blade about 17 degrees to get the "twist" that makes the slug spin.
Once you have made the 8 grooves (or however many you want) around the circumference you can drill the center and sandwich the front and back with some hardware. I used a fender washer on the nose of the slug, a 2.5" long machine screw and an acorn nut. I've made some with no hardware, a self tapping screw and washer on the nose, etc. It's all about finding the right weight, balance, durability for your application.
Here are some pics of the slugs. I am uploading vids that I will add to this post later on.


Let me know what you think and if you have any ideas about ways to improve these that would be great...I'll be glad to try them out.
EDIT: Testing the slug Vid
[youtube][/youtube]