deus ex machina how to, NEW update: animation
-
- Staff Sergeant
- Posts: 1596
- Joined: Fri Dec 15, 2006 3:57 pm
- Location: maryland
- Has thanked: 3 times
- Been thanked: 9 times
Please note that this is not a basic spud gun so should first become familiar with pneumatics. The deus ex machina uses an a continuous air source such as a large air compressor for pneumatic tools, the air source attaches via hose to a modified blow gun when the handle is not squeezed the valve connects the air source to the pilot port in the modded sprinkler valve (thus filling the chamber) and when squeezed it blocks from the air source and vented air from the pilot into the atmosphere (thus triggering the sprinkler valve to open)
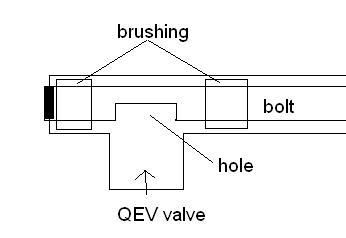
I would recommend using a 3/4" QEV (quick exhaust valve) and another 3way-2position valve (sleeve valves are popular choices) instead of a sprinkler valve and modded blowgun due to the poor flow and slow fill rates, I choose these valves because I already owned them and I'm very reluctant to order parts online (note: besides parts I already owned the deus ex machina only cost me $20 to make)
I will not go into detail about the specific assembly of the pneumatics in the deus ex machina, the specific details should be determined based on one's aesthetic preferences and available parts
the rest of this HOW-TO will focus on the construction of the bolt action cartridge feeding and ejecting system
edit:warning the design in this how-to takes advantage of various pipe and coupler sleeving tricks, for example most 3/4" couplers are relatively smooth with the exception of one or two small bulges they can slide into most 1" pvc, if the they require a significant amount of sanding or lathe work to make the coupler fit then this approach is not worth attempting, unfortunately there is no specific standard for the outer diameters of couplers or the inner diameters of pvc pipe so please c
material:
bandsaw or scroll saw
dremel or stick file
router (for bolt action slot or else you'll have to find another way)
a threaded bolt to use as a bolt handle and one to be the ejector
1.25pvc
3/4" pvc
3/4" couplings you will need plenty of these based on how many cartridges you want
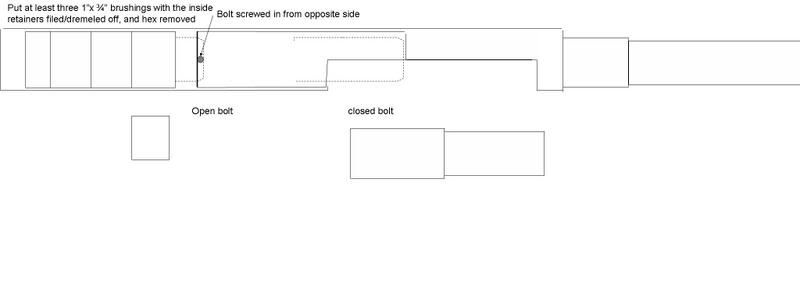
3+ 3/4"x1" brushings
the short depth of the 2x4 are almost perfect for these shells
the side (left and right) walls will be made from thin plexiglass, and the magazine spring should be made from music wire
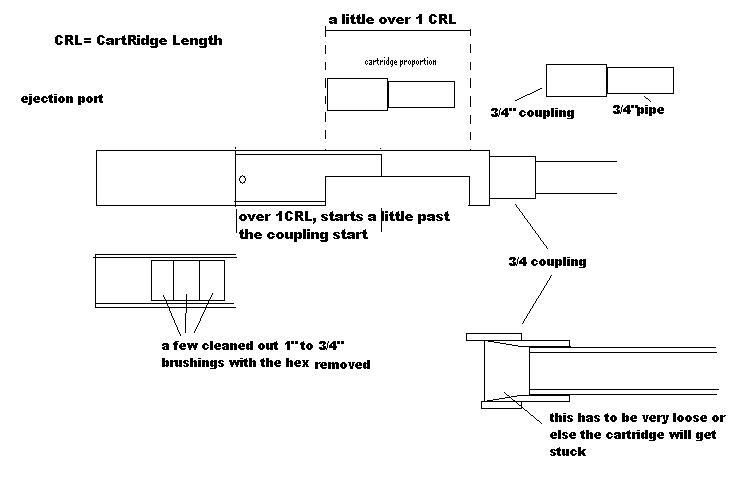
important info the cartridge ejection system works by having the bolt on the oposite side hit the rim of the cartridge causing it to flick off and out the ejection port, the secret to make this work is to make the front coupling very losess and the bolt pretty tighter but hang on by half a centimeter so when you first use this you will have to use keep on ajusting the friction in the front coupling and bolt, I recomend grinding the front with somthing smooth or use a polishing brush bit on your dremel, and for the bolt I found that a preparing a drop of JB weld on some paper then smearing it all over the front evenly to create a new layer works pretty well
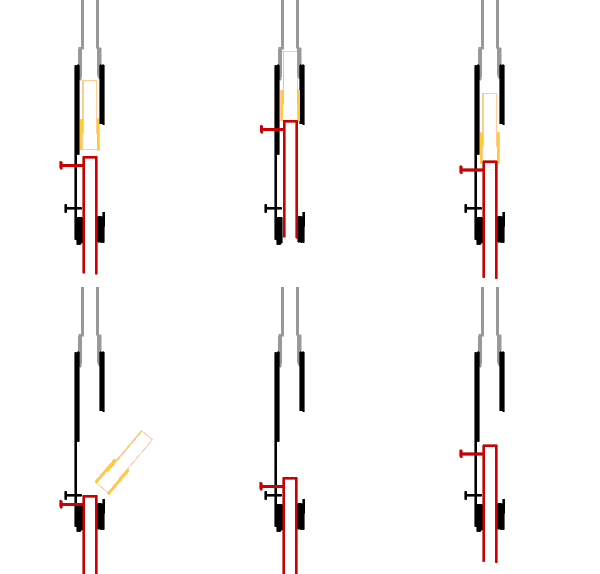
NEW UPDATE AN ANIMATED DIAGRAM
really the new cartridge should instantly appear because this is magazine fed, but I forgot and I already made the frames without it by the time I realized
here a video of my deus ex machina which is diffrent only in terms of sizes and fittings used to accomplish the task this way involves lots of grinding down at the belt sander but it includes all the basic parts, http://s30.photobucket.com/albums/c328/ ... ¤t=D SCF0890.flv
I used an original blowgun mod to fill and actuate the valve
http://www.spudfiles.com/forums/semi-blowgun-t6877.html
here all the other threads about the deus ex machina
http://www.spudfiles.com/forums/deus-ex ... t7723.html
http://www.spudfiles.com/forums/deus-ex ... t7864.html
http://www.spudfiles.com/forums/deus-ex ... t8418.html
I would recommend using a 3/4" QEV (quick exhaust valve) and another 3way-2position valve (sleeve valves are popular choices) instead of a sprinkler valve and modded blowgun due to the poor flow and slow fill rates, I choose these valves because I already owned them and I'm very reluctant to order parts online (note: besides parts I already owned the deus ex machina only cost me $20 to make)
I will not go into detail about the specific assembly of the pneumatics in the deus ex machina, the specific details should be determined based on one's aesthetic preferences and available parts
the rest of this HOW-TO will focus on the construction of the bolt action cartridge feeding and ejecting system
edit:warning the design in this how-to takes advantage of various pipe and coupler sleeving tricks, for example most 3/4" couplers are relatively smooth with the exception of one or two small bulges they can slide into most 1" pvc, if the they require a significant amount of sanding or lathe work to make the coupler fit then this approach is not worth attempting, unfortunately there is no specific standard for the outer diameters of couplers or the inner diameters of pvc pipe so please c
material:
bandsaw or scroll saw
dremel or stick file
router (for bolt action slot or else you'll have to find another way)
a threaded bolt to use as a bolt handle and one to be the ejector
1.25pvc
3/4" pvc
3/4" couplings you will need plenty of these based on how many cartridges you want
3+ 3/4"x1" brushings
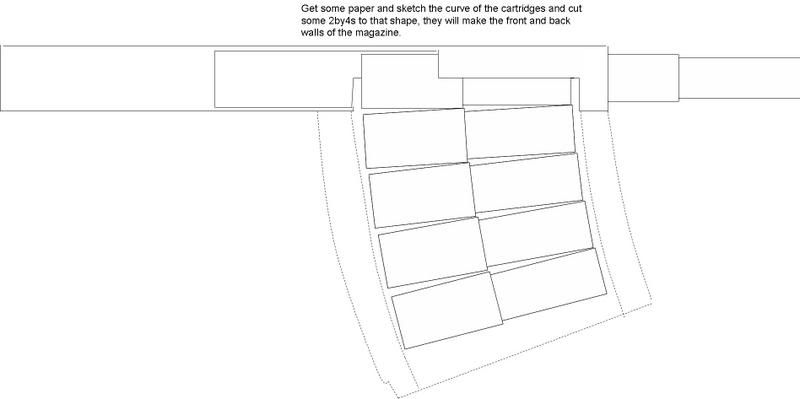
the short depth of the 2x4 are almost perfect for these shells
the side (left and right) walls will be made from thin plexiglass, and the magazine spring should be made from music wire
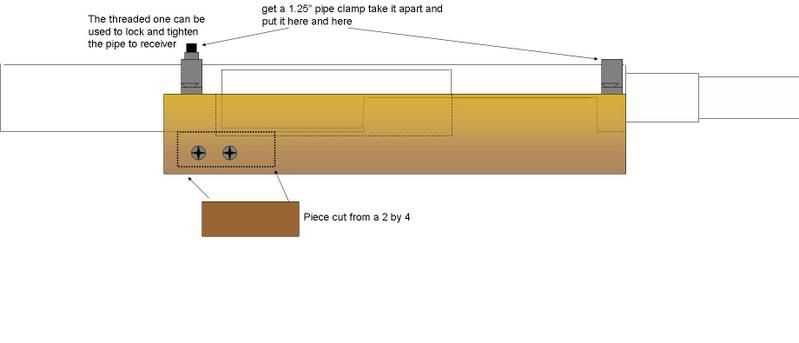
important info the cartridge ejection system works by having the bolt on the oposite side hit the rim of the cartridge causing it to flick off and out the ejection port, the secret to make this work is to make the front coupling very losess and the bolt pretty tighter but hang on by half a centimeter so when you first use this you will have to use keep on ajusting the friction in the front coupling and bolt, I recomend grinding the front with somthing smooth or use a polishing brush bit on your dremel, and for the bolt I found that a preparing a drop of JB weld on some paper then smearing it all over the front evenly to create a new layer works pretty well
NEW UPDATE AN ANIMATED DIAGRAM
really the new cartridge should instantly appear because this is magazine fed, but I forgot and I already made the frames without it by the time I realized
here a video of my deus ex machina which is diffrent only in terms of sizes and fittings used to accomplish the task this way involves lots of grinding down at the belt sander but it includes all the basic parts, http://s30.photobucket.com/albums/c328/ ... ¤t=D SCF0890.flv
I used an original blowgun mod to fill and actuate the valve
http://www.spudfiles.com/forums/semi-blowgun-t6877.html
here all the other threads about the deus ex machina
http://www.spudfiles.com/forums/deus-ex ... t7723.html
http://www.spudfiles.com/forums/deus-ex ... t7864.html
http://www.spudfiles.com/forums/deus-ex ... t8418.html
Last edited by iknowmy3tables on Sun Feb 14, 2010 5:13 pm, edited 10 times in total.
-
- Corporal 2
- Posts: 675
- Joined: Thu Feb 15, 2007 9:20 pm
Well, you beat me in posting a how-to on a competition gun.Looks good so far,but still a little vague.Looking forward to seeing the plans done.
-
- Staff Sergeant
- Posts: 1596
- Joined: Fri Dec 15, 2006 3:57 pm
- Location: maryland
- Has thanked: 3 times
- Been thanked: 9 times
technically jack beat us both by making an extera breif how to on his thread that was one picture with instuctions
- jackssmirkingrevenge
- Five Star General
- Posts: 26203
- Joined: Thu Mar 15, 2007 11:28 pm
- Has thanked: 569 times
- Been thanked: 344 times
for a simple coaxial you don't need much else, in fact I'm surprised people requested a how-to at alliknowmy3tables wrote:technically jack beat us both by making an extera breif how to on his thread that was one picture with instuctions
hectmarr wrote:You have to make many weapons, because this field is long and short life
-
- Private
- Posts: 10
- Joined: Mon Jan 29, 2007 5:31 pm
What pushes out the cartridge after firing
is it just the pressure from the spring behind the cartridges
Anything would be appreciated
is it just the pressure from the spring behind the cartridges
Anything would be appreciated
-
- Staff Sergeant
- Posts: 1596
- Joined: Fri Dec 15, 2006 3:57 pm
- Location: maryland
- Has thanked: 3 times
- Been thanked: 9 times
good question bing, edit type type type how's that
-
- Staff Sergeant
- Posts: 1596
- Joined: Fri Dec 15, 2006 3:57 pm
- Location: maryland
- Has thanked: 3 times
- Been thanked: 9 times
well... in the video on the opposite side there is a groove I cut with a router the groove loosely fits the screw/handle/action, the screw is attached to the bolt and that screw is used to toggle the bolt
and how is it air tight, its not really "air tight" but its not really holding pressure its directing flow. just like how breech loading guns don't have perfect o-ring seals and most leak to some degree, they just use very close friction seals, just like this were the small sleeving off parts add a friction seal to direct 99% of flow.
and you attach the whole thing on to the valve just like how you attach a 1.5" pvc barrel to your valve
if you asking how to attach the air source to the valve and chamber so it automatically refills the chamber between shots you can:
use a flow controlled air input and valve like in these guns
http://www.spudfiles.com/forums/simple- ... t6109.html
ball valves are not recommended to regulate flow
http://www.spudfiles.com/forums/true-semi-t156.html
that other hose and needle is just to help the sprinkler valve too close faster
or a 3way valve actuating/filling a Piston valve, QEV, or even a sprinkler valve with the spring removed
http://www.spudfiles.com/forums/revosemi-t7694.html
http://www.spudfiles.com/forums/semi-auto-t160.html
or even my gun only the 3way is a specially modded blow gun
http://www.spudfiles.com/forums/semi-blowgun-t6877.html
thanks, you answered all my questions perfectly.
but i have one more (sorry ) what is the actual bolt? from what i can see its another piece of 3/4in pvc that locks into the shell. and whats the whole part about the 3/4x1" bushings? and do you have the actual lengths of the pipes?
thank you so much, o yea and i've been building pnuematic cannons for over 4 yrs. and i can honestly say this is the best one i've ever seen, you put all of my cannons to shame, so well done
-
- Staff Sergeant
- Posts: 1596
- Joined: Fri Dec 15, 2006 3:57 pm
- Location: maryland
- Has thanked: 3 times
- Been thanked: 9 times
sorry i didn't get around to this post earlier the bolt is that sliding thing of 3/4"pvc that attaches to the cartridges, the measurements are all scaled in comparison to the cartridge length (its a scaled drawing) which you chose based on the ammo you want to use, and the cleaned out bushings are a way of sleeving over the bolt unless you want to do all the grinding work on the bolt to make it sleeve in 1"pvc, thank you for the complement but if you want to improve this design i recommend putting a tee input rater that a inline input and a qev or piston valve this will make it much shorter helping to deal with the abnormal length of my gun
Eddbot, are you kidding me. I'm sorry to get irritated at you, but there's a button at the top called the Wiki. Click on it and read all about pneumatics.
And yes, you can use an air compressor, for portable setups some ppl use a CO2 regulator hooked up to a CO2 tank.
Sorry for being irritated, but you could search, and I'm having a really, really, crappy day
And yes, you can use an air compressor, for portable setups some ppl use a CO2 regulator hooked up to a CO2 tank.
Sorry for being irritated, but you could search, and I'm having a really, really, crappy day
"Some say his pet elephant is pink, and that he has no understanding of "PG rated forum". All we know is, he's called JSR. "
-
- Staff Sergeant
- Posts: 1596
- Joined: Fri Dec 15, 2006 3:57 pm
- Location: maryland
- Has thanked: 3 times
- Been thanked: 9 times
thats alright hes new thats his first post, welcome and yes it uses the air from a large air compressor. but reading spud wiki is a good idea if you what to learn all the basics