How to Make an Electrolysis Machine V.2

A place for general potato gun questions and discussions.
Killjoy
Sergeant
Sergeant
Posts: 1052
Joined: Sun Nov 12, 2006 12:51 am
Location: New Mexico

Sun Nov 11, 2007 4:37 am

Well after a recent interest in an electrolysis machine (located here http://www.spudfiles.com/forums/eloctro ... 11608.html), I decided it was time to rebuild mine (or to be more percise, make a totally new one).
My old one can be found here: http://www.spudfiles.com/forums/how-to- ... 20305.html


I decided this one had to be easy to build, relatively cheap, and everything had to be easily accessible, which it is in all catoagories.

Unlike my first one, I ditched the collection tank and such, as they weren't very neccessary and limited the portableness of the setup. Also looking over the parts list of my old one, there was a lot of excess parts, so this current one was designed with a short parts list in mind. I also wanted a more profesional looking one and not the ghetto/meth lab looking one I first built.
The entire thing cost about 30 bucks, and took a little under 2 hours to assemble. And all the parts came from either Home Depot, or Ace Hardware.

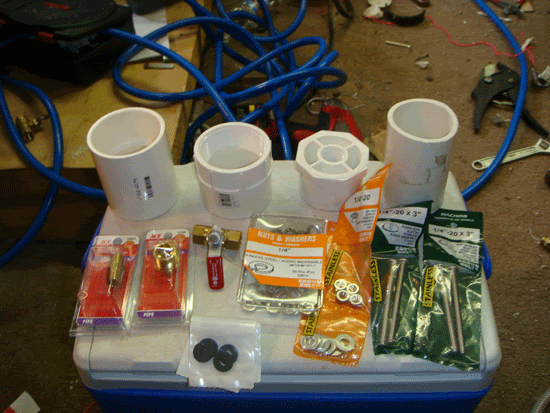
Parts:
Tank
2" coupler
2" threaded adapter
2"-1/2" bushing reducer
3" long piece of 2" pipe sch40
1/2"-1/4" brass reducer
1/4" hex male-male fitting
1/4" ball valve
2- 1/4" hose barb fittings and 2 feet of hose

Electrode set up
2" threaded plug
4- 3" long 1/4" stainless steel bolts
4- 1/4" stainless steel nuts
4- 1/4" stainless steel washers
8- 1/4" neoprene washers
50+ pack of stainless steel lock washers
2- rubber grommets
2- 2" long pieces of 3/16" copper pipe

Other
assorted tools
pvc cement and primer
pipe dope
solder
wire
water and baking soda
Image

Electrode Plug

Step 1

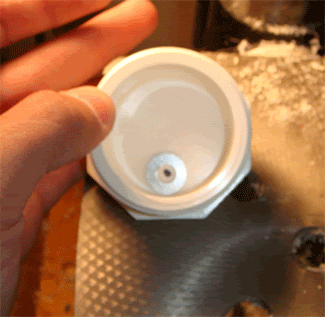
Take a washer and set it on the bottom and position it along the side of the plug where you want the bolt to go through, and mark with a sharpie; like so...
Image

This is done so the you won't drill the hole for the bolt to close to the plug wall, preventing the washer from sitting flush on the bottom.

Step 2
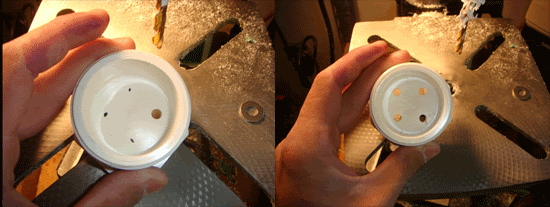
Repeat step 1 three more times, so that you have four dots on the plug bottom. Then drill out the holes with a 1/4" drill bit and scrap off the price tag. I recommend that you then run the drill bit through the hole and apply pressure to the sides with the bit, making the hole larger so that the bolt will easily pass through. You should now have something like this.
Image

Step 3

Take the pieces of copper pipe, and flatten them. Then position one over the outside holes of the plug, and mark from the inside of the plug with a sharpie. Then drill a hole in the flattened copper with a 1/4" bit, and then widen the holes. Bend an end up slightly, and solder a wire onto it.

Image

Step 4
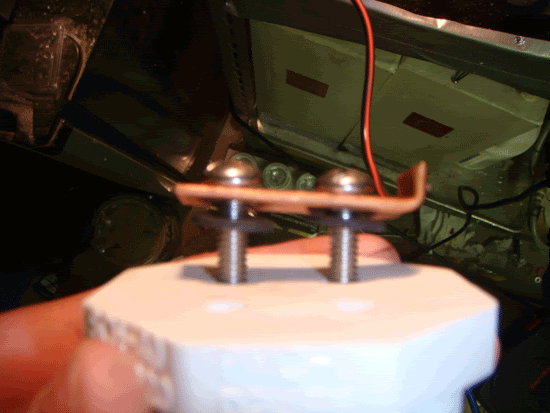
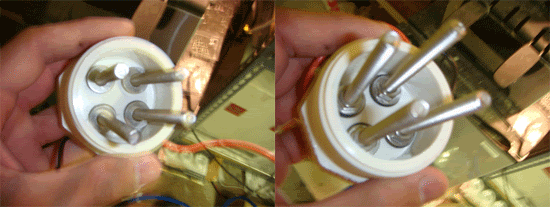
Put 2 of the bolts throught the holes in the copper, and then put a neoprene washer onto the bolt. Take this and push the two bolts through the holes in the plug.
Image

Do this again for the other two bolts, and then put neoprene washers on the bolts protuding out of the bottom of the plug, then a stainless steel washer, and then thread on the nuts and tighten it as best you can.
Image

Step 5.
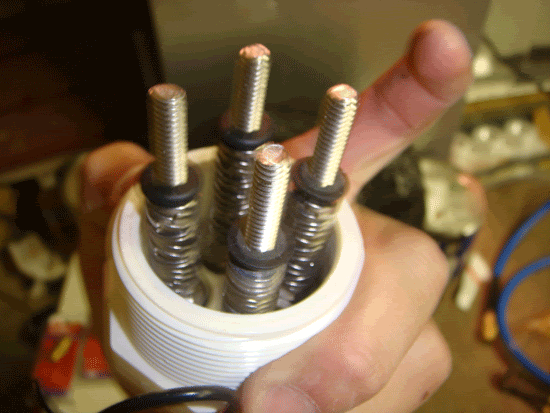
Finally, add the lock nuts, trying your best to get them not to line up, so that there are gaps between them. Add equal numbers of the washers onto the bolts (or as close to equal as you can get). Then cut the grommets in half and push a hald onto each bolt to keep the washers from falling off when the entire set up is move (Don't push the grommet half as hard as you can, just enough so the washers are loose but don't have a lot of play).
Image

Your done, now onto the electrolysis chamber

Electrolysis Chamber/Water Tank

Step 1
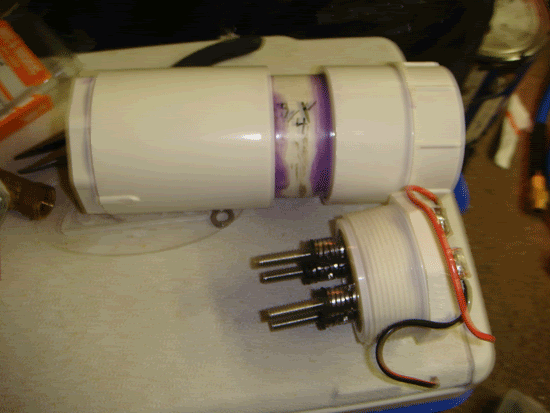
Glue the bushing reducer into the coupler, then the pipe into the other end of the coupler, and then the threaded adapter onto the end of the pipe. Let dry.
Image

Step 2
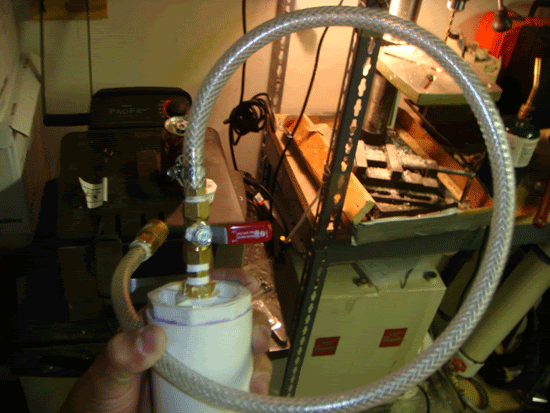
After letting dry for 30 mintues or so, go ahead and screw a hose barb into the 1/4" ball valve, then screw the 1/4" ball valve onto the 1/4" hex nipple, then screw that into the 1/2"-1/4" reducer, and then finnaly screw the entire thing into the pvc bushing. Screw a female quick disconnect onto a hose barb and then fit the hose onto both hose barbs, secruing with clamps. (remember to use ptfe/ pipe sealing tape on all threaded connections).
Image


Final Assembly

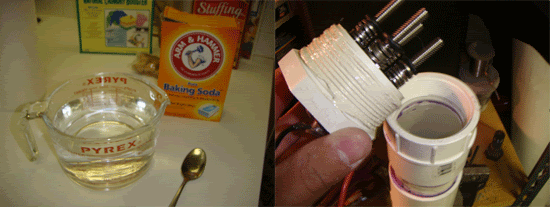
Take some warm water (about 4 cups) and mix in several table spoons (3 or 4) into the water, continuing to stir until it all disolves and the water is clear.
Take this mixture and pour it into the elelctrolysis chamber (close the ball valve prior to filling). Apply pipe dope to the elelctrode plug, and screw it into the threaded adapter.
Image

Thats it, your done, and the final product....
Image


Notes

This thing has decent gas production, it can fill small balloons with ease, and can pressurize itself to a decent pressure within a few minutes (not sure exact pressure). Currently I use and 8 amp hour lead acid rechargeable battery, but I have plans to upgrade to a larger battery eventually.

Down sides:
1) It's small, so it gets warm after short uses.
2) Because it's small, Gas production isn't amazing, but it is still good for the thing's size.

Upsides:
1) Cheap, easy to get the parts, and easy to build
2) much safer then my old one in that it doesn't leak.
3) Looks pretty good.

Upgrades:
Seeing as I was working on a budget, I went with the washer approach. But most hardware stores sell stainless steel wall outlet plates, and those could be use with a little cutting and bending in this setup to greatly increase surface area.
The water volume could alse be increased to keep the thing from getting so hot rapidly.[/url]
Last edited by Killjoy on Sun Jan 13, 2008 11:55 pm, edited 1 time in total.
Stanford Class of 2012

"In the end our society will be defined not only by what we create, but what we refuse to destroy"- John Sawhill
Tom
Specialist
Specialist
Posts: 187
Joined: Fri Aug 24, 2007 8:22 am

Sun Nov 11, 2007 4:58 am

Looks very neat, A while ago I made a elecrolyses machine but ther didn't come of any H2 :x . You could also better use a battery charger :!: .
GR.Tom
Really really proud member of the Dutch Spud Clan!
User avatar
mopherman
Corporal 3
Corporal 3
Posts: 788
Joined: Sat Feb 03, 2007 8:20 pm
Been thanked: 1 time

Sun Nov 11, 2007 9:01 am

wow thanks. This really helps my understanding of these things.
searching for a modern day savior from another place,inclined toward charity,everyone's begging for an answer,without regard to validity,the searching never ends,it goes on and on for eternity
-Bad religion
User avatar
jimmy101
Sergeant Major 2
Sergeant Major 2
United States of America
Posts: 3206
Joined: Wed Mar 28, 2007 9:48 am
Location: Greenwood, Indiana
Has thanked: 6 times
Been thanked: 18 times
Contact:

Sun Nov 11, 2007 12:06 pm

Final Assembly

Take some warm water (about 4 cups) and mix in several table spoons (3 or 4) into the water, continuing to stir until it all disolves and the water is clear.
Didn't know that tablespoons would dissolve in water. Just kidding. Looks very nice. The electrolyte is baking soda?

If you can get a hold of some NaOH or KOH it'll work a bit better and be less likely to corrode your electrodes. (Many drain cleaners are basically pure NaOH or KOH, "Drano" also contains a bit of aluminum shavings.) Baking soda (NaHCO<sub>3</sub>), aka sodium bicarbonate, is fairly basic but a stronger base works a bit better.

12V is really too much for a single electrolysis cell. The higher the voltage the more you'll get other electrolysis reactions happening. In addition, the higher voltage means you are getting more ohmic heating than you should. Make four or five of your cells and wire them in series with your 12V power source.

Or, measure the resistance of your cell and try to come up with a suitable load resistor that'll handle the current. If the cell resistance is in the vicinity of 100 Ohms then a standard 100W light bulb in series will cut the voltage (and current) in half. A 100W, 120V light bulb is basically a 100 watt (well duh) ~100 Ohm resistor, they make great cheap high power ballast resistors.
Image
Killjoy
Sergeant
Sergeant
Posts: 1052
Joined: Sun Nov 12, 2006 12:51 am
Location: New Mexico

Sun Nov 11, 2007 12:35 pm

If you can get a hold of some NaOH or KOH it'll work a bit better and be less likely to corrode your electrodes. (Many drain cleaners are basically pure NaOH or KOH, "Drano" also contains a bit of aluminum shavings.) Baking soda (NaHCO3), aka sodium bicarbonate, is fairly basic but a stronger base works a bit better.
I was planning on using NaOH since I have a big jar somewhere, but I couldn't find it, so baking soda was the next best/only thing I had. But your right, they're better then just baking soda.

And I'll try cutting the voltage, either with the light bulb idea, or just ordering, say, a 6 volt lead acid battery. Thanks for you suggestions.
Stanford Class of 2012

"In the end our society will be defined not only by what we create, but what we refuse to destroy"- John Sawhill
User avatar
BigJon
Specialist
Specialist
Posts: 120
Joined: Wed May 30, 2007 12:21 pm

Sun Nov 11, 2007 1:27 pm

This might be a noob question but what do you do with the gas that is produced from this?
User avatar
jimmy101
Sergeant Major 2
Sergeant Major 2
United States of America
Posts: 3206
Joined: Wed Mar 28, 2007 9:48 am
Location: Greenwood, Indiana
Has thanked: 6 times
Been thanked: 18 times
Contact:

Sun Nov 11, 2007 3:29 pm

Killjoy

Do you think you could get the H2 and O2 seperate if there was a small wall on the outlet end of the chamber and you had two exit hoses?
Image
User avatar
mopherman
Corporal 3
Corporal 3
Posts: 788
Joined: Sat Feb 03, 2007 8:20 pm
Been thanked: 1 time

Sun Nov 11, 2007 3:52 pm

BigJon wrote:This might be a noob question but what do you do with the gas that is produced from this?

blow $hit up. Hydrogen and oxy could also be used as a spudgun fuel. You would need a full metal gun for it though. Hydrogen is also lighter than air, so you could make balloons. use your imagination
searching for a modern day savior from another place,inclined toward charity,everyone's begging for an answer,without regard to validity,the searching never ends,it goes on and on for eternity
-Bad religion
User avatar
BigJon
Specialist
Specialist
Posts: 120
Joined: Wed May 30, 2007 12:21 pm

Sun Nov 11, 2007 5:56 pm

lol. But anyways thats a nice set up you got there.
Killjoy
Sergeant
Sergeant
Posts: 1052
Joined: Sun Nov 12, 2006 12:51 am
Location: New Mexico

Sun Nov 11, 2007 8:15 pm

Killjoy

Do you think you could get the H2 and O2 seperate if there was a small wall on the outlet end of the chamber and you had two exit hoses?
You could, just would need a little modification and measuring. The wall would have to continue probably about 3/4 of the way, and then glue a wall between the electrodse on the cap which protrudes up, so when it is screwed in the two sections kinda make one wall....I think that makes since. But yeah it will work.
blow $hit up. Hydrogen and oxy could also be used as a spudgun fuel. You would need a full metal gun for it though. Hydrogen is also lighter than air, so you could make balloons. use your imagination
Exactly, my plan was to use this in my new hybrid.
Stanford Class of 2012

"In the end our society will be defined not only by what we create, but what we refuse to destroy"- John Sawhill
ninjafroglet
Private
Private
Posts: 11
Joined: Fri Nov 09, 2007 5:32 am

Sun Nov 11, 2007 10:33 pm

I'm not entirely sure but i think graphite electrodes are better for electrolysis than steel, ideally platinum should be used for hydrogen production, but that gets a little expensive.
User avatar
jimmy101
Sergeant Major 2
Sergeant Major 2
United States of America
Posts: 3206
Joined: Wed Mar 28, 2007 9:48 am
Location: Greenwood, Indiana
Has thanked: 6 times
Been thanked: 18 times
Contact:

Mon Nov 12, 2007 11:32 am

ninjafroglet wrote:I'm not entirely sure but i think graphite electrodes are better for electrolysis than steel, ideally platinum should be used for hydrogen production, but that gets a little expensive.
Graphite electrodes (e.g., graphite welding rods) work well but are really not needed. With the correct electrolyte and voltage, steel and iron, even zinc plated, work well.

In a laboratory, graphite and platinum electrodes are used for generic electrolysis setups so that the same rig can be used for pretty much any electrolysis (even in molten salt). In the case of electrolysis of water they are kind of overkill.
Image
MetalMSTR
Private 2
Private 2
Posts: 37
Joined: Sun Nov 11, 2007 10:38 pm
Has thanked: 1 time

Mon Nov 12, 2007 2:23 pm

wow it looks great but yes you ll need a iron spudgun to support that energy so lets use it to make explosive ballons :twisted: :twisted:
and trow it to the fu·$%neigthborgs niegthborgs :twisted:
User avatar
the beast
Private 2
Private 2
Posts: 22
Joined: Wed Sep 12, 2007 9:00 pm

Mon Nov 12, 2007 10:32 pm

correct me if im wrong but if you put hydrogen into a pneumatic wont it fire much faster/further. like in the same gun hydgrogen at 50 psi will outperform air at 50 psi right.
Killjoy
Sergeant
Sergeant
Posts: 1052
Joined: Sun Nov 12, 2006 12:51 am
Location: New Mexico

Mon Nov 12, 2007 10:43 pm

Im not sure. I assume so since hydrogen is less dense then air.
Stanford Class of 2012

"In the end our society will be defined not only by what we create, but what we refuse to destroy"- John Sawhill
Post Reply