How to make an electrolysis machine
Posted: Mon May 21, 2007 11:56 pm
So its been the first 4 days of my summer, and I'm already bored out of my mind, so today I figured I would rebuild my electrolysis machine into a more efficient one (and one that actually works). This one though isn't big, but it can produce a decent amount of gas in a short amount of time, and is perfect for filling ballons and small combustion shells with a hydrogen oxygen mix. This also doesn't seperate the oxygen and hydrogen as my previos one did, mainly because i was to lazy to make it so it could, so it is kind of dangerous, but i really don't care.
What i used to build this (and what you'll need if your gonna make it):
2, 2" pvc caps (one flat, the other whatever).
1, 1/4" ball valve
Piece of clear Acrylic
+- 4" piece of 2" pvc
4, 1/4" 2" long stainless steel bolts
lots of stainless steel 1/4" washers (for increasing surface area of electrodes and gas production)
4, 1/4" stainless steel nuts
1/4" rubber grommets for spacers
couple feet of 1/4" tubing and irrigation barb fittings
Assorted screws, smallish (no bigger then 1/4")
Hot glue, Seal All (or some sort of sealent, preferably with a high temp rating, like silicone), epoxy, super glue and accelerater (optional but makes this build quicker)
1, 1 liter water bottle
1, 1.5 liter bottle
Piece of 1" pipe and end cap
1, tiny brass screw valve (commenly used for water coolers and plumbing)
Something to build stand out of (like wood)
Electrolysis Chamber
The Electrolysis chamber consists of a 4" long piece of 2" pvc pipe, with one end cap glued on to one end.
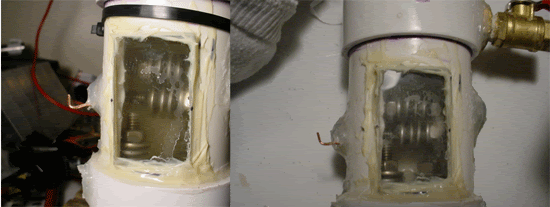
To view and make sure the thing is working, I cut a 1"x2"rectangle piece of acrylic and expoxied it in. I then screwed in the bolts through the sides of the pipe, screwed on one nut and put 4 washers spaced by the grommets (which you want to cut in half so that they are thin wafers with a hole, and then slide one onto the bolt between washers. You can also trim the edges to allow for maximum exposure of the washers to the water). I then scewed on another nut to secure the wahsers, ruffly in the middle of the pipe. I mounted 2 bolts through the sides of the pipe (which had 4 washers each), and then mounted 2 bolts sticking up through the unglued end cap (these had 7 washers, also spaced with trimmed grommets and nutes to secure them).
Around the two bolts on the side, I wrapped copper wire around so both were connected, but before you tighten them down all the way, put a generous amount of sealent between the bolts and pipe to make sure there aren't any leak (as I obviosly did not do and had to cover the entire bolt in sealent afterards). Do the same with the pvc cap with the other two bolts, and then put a line of selent around the open end of the pipe and push on the cap and secure with screws.
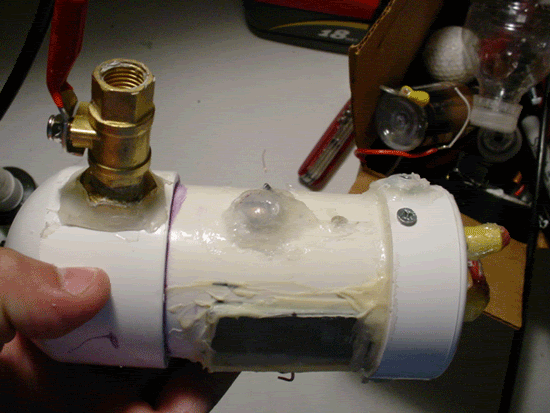
After leting the sealent dry, drill a hole in the top cap (one with out bolts), and super glue/epoxy a 1/4" barb fitting in for the hose to connect to the collection bottle. Then drill a 1/2" hole and screw in the valve(for filling). You will also need to drill a small hole for the relief screw that will allow air to escape during filling when unscrewed.
You should have some thing that looks along these lines

the fill valve and relief screw (small screw on right)

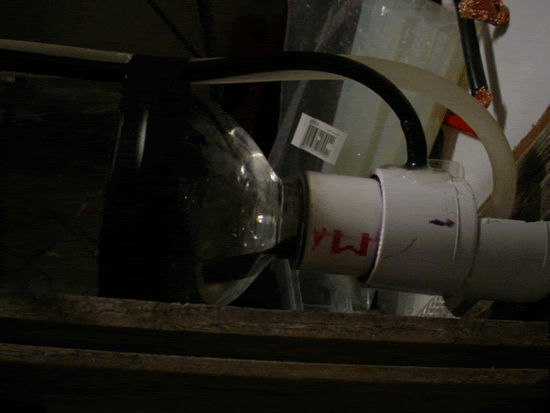
Now sand off the threads on the 1 liter bottle and glue on the piece of pvc with the end cap (this will be the gas collection bottle). Then drill a hole in the bottom of the end cap for the water hose, and a hole on the side of the pvc pipe for the gas tube from the electrolysis chamber (the tubing should be slid through and be positioned so that the end is slightly above the mouth of the bottle, which can be seen in the left side of the bottle). Glue both int securly

Clear tube is for the water, the black tube is for the hydrogen and oxygen gas from the electrolysis chamber)
Then drill a hole in the bottom of the bottle and super glue in the small screw brass valve (I mounted mine in 1/4" braided hose with a hose clamp, and then super glued the hose to the bottle with a hose barb so the valve was removable). this will make the exit valve for the gas, as the bottle will be inverted with the ass-end facing up (technical term).
Finnally take the clear hose and attach this to a barb fitting glued in the cap of the 1.5 liter bottle. Then connect the hose glued into the collection chamber to the hose barb on the top of the electrolysis chamber. The hoses shoule be long enough and bent so that they rise up above the water level in the collection bottle vefore going to their appropiate conectors to prevent the water from draining out of the collection bottle (or mixing with the water in the electrolysis chamber). Mount the entire setup to a stand, and your done.
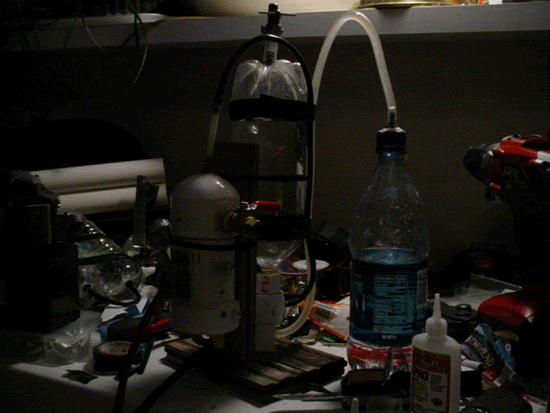
Mine looked like this after completion

The white cylinder thing on the right is the electrolysis chamber, the inverted bottle in the middle is the collection chamber, and the bottle on the right with the clear tube connected to the top is the overflow/water injection bottle.
Operation
Filling
Fill the 1 liter bottle all the way up with water so there's no air in it. I do this by filling the 1.5liter bottle with water and then squezzing the bottle, forcing the water into the collection bottle, and then closing the top valve to prevent the water from flowing back.
Next fill the electrolysis chamber with a distiller water sodium bicarbonate or sodium hydroxide solution (add enough so it completly dissolves after stiring and the water is clear, usually about a table spoon). Unscrew the little screw, and then fill through the ball valve until the water comes out, then screw the little screw back down and close the ball valve and your set.
Producing Gas
I connect the bolts to the positive and negative leads of a 12v 8 amp hour led acid battery (side bolts negative, bottom bolts positive). Immediatly you should see bubbles form, and then the water should become completly cloudy with bubbles.
As the gases form, they will pass through the hose and bubble up though the water in the collection bottle, forcing the water out and through the tube into the 1.5 liter bottle. Slowly pressure will begin to build and the bottles should become rigid, as well as any leaks appearent (i got sprayed in the eye, not pleasant). Stop, release pressure, and fix any leaks with sealent.
There you go, your own personal ghetto electrolysis machine.
Downsides
After extended use (like 10 minutes), the water gets hot enough from all the current passing through it that it will start to boil, and in my case melt the hot glue used to seal and leak(which is why i switched to Seal All as sealent). To fix this you could use a lower amperage power source, like 2 amps or so, but I'm to lazy to find something. You could also make the electrodes close together, but in a larger volume of water to disipate heat, but i wanted mine compact and chose small and compact with short runtimes over large with long runtimes.
The oxygen and hydrogen are not seperated either in the collection bottle, so there is a slight explosion hazard, but as long as there are no leaks, and you don't do this near open flame you should be fine.
Also this doesn't produce much gas, but for its size is pretty damn fast at filling up the collection bottle (about 10 minutes or so), and becazse it is small, could be modified to be mount on a cannon for on board fuel production.
Further plans
I plan on building another one in a piece of 4" pvc pipe, 16" long, with 6 1/16" thick 12"x2" 316 stainless steel plates, which will provide much more gas production because of the increased surface area. It will have a pump and cooling system and be connected to 80 amp homemade transformer of my design, but that will be another project for another day.
What i used to build this (and what you'll need if your gonna make it):
2, 2" pvc caps (one flat, the other whatever).
1, 1/4" ball valve
Piece of clear Acrylic
+- 4" piece of 2" pvc
4, 1/4" 2" long stainless steel bolts
lots of stainless steel 1/4" washers (for increasing surface area of electrodes and gas production)
4, 1/4" stainless steel nuts
1/4" rubber grommets for spacers
couple feet of 1/4" tubing and irrigation barb fittings
Assorted screws, smallish (no bigger then 1/4")
Hot glue, Seal All (or some sort of sealent, preferably with a high temp rating, like silicone), epoxy, super glue and accelerater (optional but makes this build quicker)
1, 1 liter water bottle
1, 1.5 liter bottle
Piece of 1" pipe and end cap
1, tiny brass screw valve (commenly used for water coolers and plumbing)
Something to build stand out of (like wood)
Electrolysis Chamber
The Electrolysis chamber consists of a 4" long piece of 2" pvc pipe, with one end cap glued on to one end.
To view and make sure the thing is working, I cut a 1"x2"rectangle piece of acrylic and expoxied it in. I then screwed in the bolts through the sides of the pipe, screwed on one nut and put 4 washers spaced by the grommets (which you want to cut in half so that they are thin wafers with a hole, and then slide one onto the bolt between washers. You can also trim the edges to allow for maximum exposure of the washers to the water). I then scewed on another nut to secure the wahsers, ruffly in the middle of the pipe. I mounted 2 bolts through the sides of the pipe (which had 4 washers each), and then mounted 2 bolts sticking up through the unglued end cap (these had 7 washers, also spaced with trimmed grommets and nutes to secure them).
Around the two bolts on the side, I wrapped copper wire around so both were connected, but before you tighten them down all the way, put a generous amount of sealent between the bolts and pipe to make sure there aren't any leak (as I obviosly did not do and had to cover the entire bolt in sealent afterards). Do the same with the pvc cap with the other two bolts, and then put a line of selent around the open end of the pipe and push on the cap and secure with screws.
After leting the sealent dry, drill a hole in the top cap (one with out bolts), and super glue/epoxy a 1/4" barb fitting in for the hose to connect to the collection bottle. Then drill a 1/2" hole and screw in the valve(for filling). You will also need to drill a small hole for the relief screw that will allow air to escape during filling when unscrewed.
You should have some thing that looks along these lines

the fill valve and relief screw (small screw on right)

Now sand off the threads on the 1 liter bottle and glue on the piece of pvc with the end cap (this will be the gas collection bottle). Then drill a hole in the bottom of the end cap for the water hose, and a hole on the side of the pvc pipe for the gas tube from the electrolysis chamber (the tubing should be slid through and be positioned so that the end is slightly above the mouth of the bottle, which can be seen in the left side of the bottle). Glue both int securly

Clear tube is for the water, the black tube is for the hydrogen and oxygen gas from the electrolysis chamber)
Then drill a hole in the bottom of the bottle and super glue in the small screw brass valve (I mounted mine in 1/4" braided hose with a hose clamp, and then super glued the hose to the bottle with a hose barb so the valve was removable). this will make the exit valve for the gas, as the bottle will be inverted with the ass-end facing up (technical term).
Finnally take the clear hose and attach this to a barb fitting glued in the cap of the 1.5 liter bottle. Then connect the hose glued into the collection chamber to the hose barb on the top of the electrolysis chamber. The hoses shoule be long enough and bent so that they rise up above the water level in the collection bottle vefore going to their appropiate conectors to prevent the water from draining out of the collection bottle (or mixing with the water in the electrolysis chamber). Mount the entire setup to a stand, and your done.
Mine looked like this after completion

The white cylinder thing on the right is the electrolysis chamber, the inverted bottle in the middle is the collection chamber, and the bottle on the right with the clear tube connected to the top is the overflow/water injection bottle.
Operation
Filling
Fill the 1 liter bottle all the way up with water so there's no air in it. I do this by filling the 1.5liter bottle with water and then squezzing the bottle, forcing the water into the collection bottle, and then closing the top valve to prevent the water from flowing back.
Next fill the electrolysis chamber with a distiller water sodium bicarbonate or sodium hydroxide solution (add enough so it completly dissolves after stiring and the water is clear, usually about a table spoon). Unscrew the little screw, and then fill through the ball valve until the water comes out, then screw the little screw back down and close the ball valve and your set.
Producing Gas
I connect the bolts to the positive and negative leads of a 12v 8 amp hour led acid battery (side bolts negative, bottom bolts positive). Immediatly you should see bubbles form, and then the water should become completly cloudy with bubbles.
As the gases form, they will pass through the hose and bubble up though the water in the collection bottle, forcing the water out and through the tube into the 1.5 liter bottle. Slowly pressure will begin to build and the bottles should become rigid, as well as any leaks appearent (i got sprayed in the eye, not pleasant). Stop, release pressure, and fix any leaks with sealent.
There you go, your own personal ghetto electrolysis machine.
Downsides
After extended use (like 10 minutes), the water gets hot enough from all the current passing through it that it will start to boil, and in my case melt the hot glue used to seal and leak(which is why i switched to Seal All as sealent). To fix this you could use a lower amperage power source, like 2 amps or so, but I'm to lazy to find something. You could also make the electrodes close together, but in a larger volume of water to disipate heat, but i wanted mine compact and chose small and compact with short runtimes over large with long runtimes.
The oxygen and hydrogen are not seperated either in the collection bottle, so there is a slight explosion hazard, but as long as there are no leaks, and you don't do this near open flame you should be fine.
Also this doesn't produce much gas, but for its size is pretty damn fast at filling up the collection bottle (about 10 minutes or so), and becazse it is small, could be modified to be mount on a cannon for on board fuel production.
Further plans
I plan on building another one in a piece of 4" pvc pipe, 16" long, with 6 1/16" thick 12"x2" 316 stainless steel plates, which will provide much more gas production because of the increased surface area. It will have a pump and cooling system and be connected to 80 amp homemade transformer of my design, but that will be another project for another day.