Thorondor (High Pressure Copper Pneumatic) - UPDATE 01/12/11

Show us your pneumatic spud gun! Discuss pneumatic (compressed gas) powered potato guns and related accessories. Valve types, actuation, pipe, materials, fittings, compressors, safety, gas choices, and more.
User avatar
mark.f
Sergeant Major 4
Sergeant Major 4
Eritrea
Posts: 3638
Joined: Sat May 06, 2006 11:18 am
Location: The Big Steezy
Has thanked: 58 times
Been thanked: 58 times
Contact:

Donating Members

Wed Mar 09, 2011 5:31 pm

HP-1 Thorondor
UPDATE: 01/12/11

[center]
High pressure pump.
High pressure pump.
Breech closed.
Breech closed.
Breech open.
Breech open.
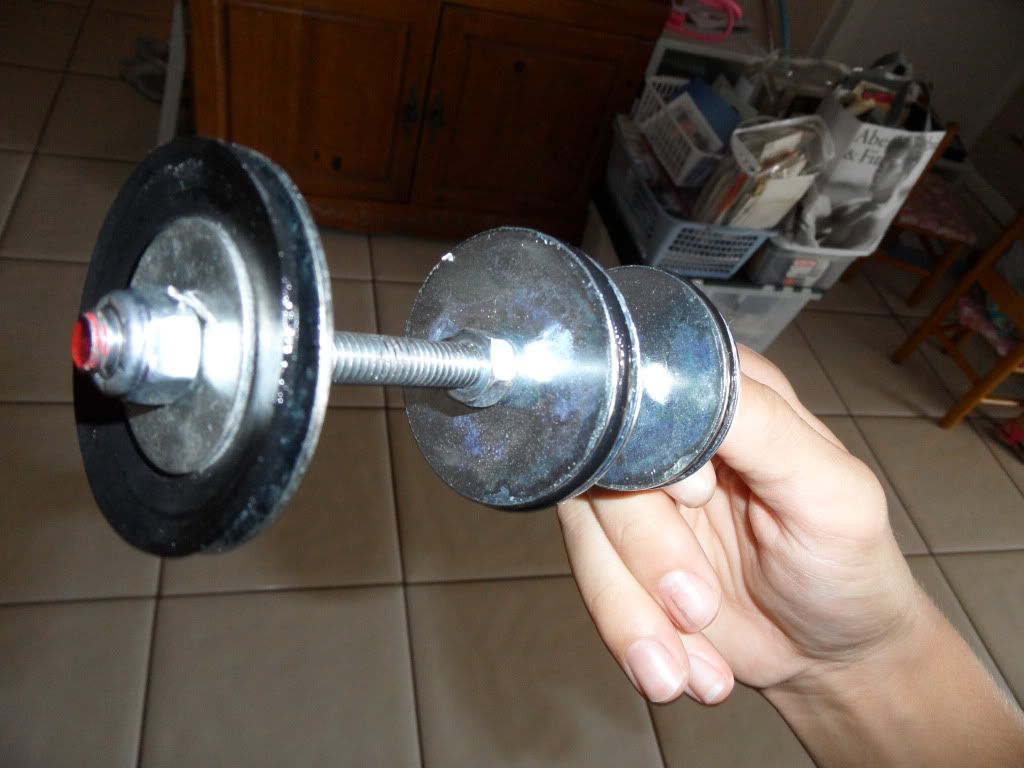
Piston.
Piston.
Barrel supports.
Barrel supports.
Looking down the barrel.
Removed the red dot sight.
The revised version.
[/center]

I've swapped and modified and tinkered, and have finally got this gun the way I'd like it.

Even with the shorter chamber, it's quite a chore getting this thing to 300 PSI, much less the originally planned 400 PSI. However, despite the reduced pressure, it still packs a big punch (in a small package!). Here's the updated damage video, in which I make it rain. :D


Overall, I'm very happy with the final product. Tell me what you think!

Specifications
Chamber: 1x18" type L copper
Barrel: 3/4x48" type L copper (ID 0.785")
Valve: barrel sealing piston valve with floating o-ring piston
Pilot: 1/4" ball valve
Operating pressure: 300 PSI

Check for the updated pictures at the bottom of the post.
EDIT: They're above now.

OLD POST

Well, I think it's just about time I post this thing.

I've had the "shell" of this launcher (the copper pipe and fittings soldered together) for nearly two years. I'd always stare at it in my closet, just waiting for an opportunity to fix it. Finally got an opportunity for Mardi Gras break, so here it is.

Overall Specifications
  • Chamber: 48" of 1" type L copper pipe
  • Barrel: 72" of 3/4" type L copper pipe (0.785" ID)
  • Operating pressure: 200 PSI, hopefully more later
HP-1 is supposed to stand for "High Pressure" model 1, or HEAL imPersonator model1... whichever you'd like. If you don't get the other part of the name you need to start reading some Tolkien. :wink:

I originally planned to take this launcher to 450 PSI with a homemade pump. The pump works fine, but even when initially filling to ~120 PSI with a cheap bike pump, and then "topping it off" with the homemade HP pump, it takes way too long to get the launcher even to 200 PSI. It's not very enjoyable, and by the time I shoot I can barely hold the barrel steady. Future modifications would include either cutting down the chamber or investing in a HPA tank and regulator.

Valve Details
The valve is a 3/4" porting barrel sealing piston valve. The piston was, overall, the most tedious to assemble part of the launcher, required about a full day to get right. The first piston I built was slightly too short, which caused the piston to jam against the barrel port. After re-polishing the barrel seat, I remedied this by moving the nylon "plug" back slightly, so it would stay in the piston track.

The piston is a one-way floating o-ring type, which allows air to flow from the pilot to the chamber (when filling the pilot pressure is higher than the chamber pressure, forcing the o-ring towards the front of the piston and uncovering the equalization (blind) hole. When piloting, the pressure in the chamber is higher, forcing the o-ring towards the back of the piston, and sealing off the pilot from the chamber completely. All of this was made with standard parts (different sized washers), and the o-ring grooves simply required a couple of wraps of teflon tape to get the piston sealing in the track pipe.

Today, I got some high durometer (70A) rubber for the sealing face, and I haven't had a single leak since.

This valve will pilot with a schrader valve, which is eventually one of the reasons I switched to an auto plug and check valve for filling.
Here lies a dead YouTube video :(

The pilot has changed a lot as well. It originally was a blowgun, but I swapped this out with a simple 1/4" ball valve mounted in a trigger's normal location. The hosing from the piston valve to the pilot valve originally was 1/4" OD copper tubing, but this turned out to inhibit my servicing the piston. I picked up a 12" length of braided stainless hose with 1/4" compression fittings at the ends, which allow for quick and reliable connections and disconnection.

Filling is accomplished through a male auto plug and a check valve.

Ergonomics (Frilly Junk)
The position of the pilot valve and the addition of a short (~10" long) shoulder stock make this thing very comfortable to shoot, even with a 7' overall length. It lends itself better to a sitting position over prone or standing, which is fine by me anyway since I usually shoot from sitting with regular firearms or airguns.

I also added a BSA red dot sight I've had laying around for years. I just had to get a new battery and it works fine. The launcher itself isn't very accurate with my current ammunition, so the best I could do was bore-sight the scope, which allows me to hit aluminum cans all day at 10 meters.

The barrel is breech loading, and slides back and forth through some 1" steel pipe nipples lined with felt.

Aesthetics
lolololololololololololololololololololololololololololololol


I haven't done much filming, so I'll have to post these low pressure shots (at 160 PSI) for now. Break ends today, so the 200+ PSI shots will have to wait.

Here lies a dead YouTube video :(


That's about all. Feel free to ask any questions as I know there's a lot of "junk" crammed into a very small space. If you have any ideas for cheap targets as well, I'll try to do some more filming after classes over the next week or two.

Here come the pictures! As always with the uploader, I can only pray these show up in the right order...

EDIT: go die in a fire, uploader. Pictures are in reverse order.
EDIT2: We uploader now.
Last edited by mark.f on Sun Apr 05, 2020 7:38 pm, edited 3 times in total.
User avatar
Lockednloaded
Staff Sergeant
Staff Sergeant
United States of America
Posts: 1566
Joined: Thu Sep 03, 2009 9:38 pm
Location: Texas, USA
Been thanked: 7 times

Wed Mar 09, 2011 7:22 pm

I really like the sort of bull-pup configuration, but that BV trigger looks a little uncomfortable. Why dont you put it right up against the pilot area and have a trigger with a rod actuate it?
User avatar
mark.f
Sergeant Major 4
Sergeant Major 4
Eritrea
Posts: 3638
Joined: Sat May 06, 2006 11:18 am
Location: The Big Steezy
Has thanked: 58 times
Been thanked: 58 times
Contact:

Donating Members

Wed Mar 09, 2011 7:35 pm

That would be good for reducing pilot volume, but as far as comfort goes it's actually pretty nice where it is. When firing I can put some pressure on the very tip of the handle until it "gives" and sort of flips the valve open. I know it sounds weird but it works. :)

I actually wasn't shooting for a bullpup configuration but, hey, I'll take what I can get. Thanks! :wink:
User avatar
Gun Freak
Lieutenant 5
Lieutenant 5
Posts: 4971
Joined: Mon Jan 25, 2010 4:38 pm
Location: Florida
Been thanked: 8 times

Wed Mar 09, 2011 7:40 pm

Why such an overly complicated piston? Mine looks like this.
Image

sorry for big pic.

And I think you should put a blowgun on.

Other than that, its pretty nice.
OG Anti-Hybrid
One man's trash is a true Spudder's treasure!
Golf Ball Cannon "Superna"M16 BBMGPengunHammer Valve Airsoft SniperHigh Pressure .22 Coax
Holy Shat!
User avatar
Gaderelguitarist
Corporal
Corporal
Posts: 580
Joined: Sat Aug 16, 2008 9:56 pm
Location: Columbia, MD
Contact:

Wed Mar 09, 2011 8:22 pm

And I think you should put a blowgun on.
Seconded. Your valve pilots with as little as a schrader, so it will definitely pilot with a blowgun. This will also make it more comfortable than a ball valve.

Not exactly a compact build, but it's well put together and gets results. I'm awaiting the increased pressure vids.
so many muchness
User avatar
mark.f
Sergeant Major 4
Sergeant Major 4
Eritrea
Posts: 3638
Joined: Sat May 06, 2006 11:18 am
Location: The Big Steezy
Has thanked: 58 times
Been thanked: 58 times
Contact:

Donating Members

Wed Mar 09, 2011 8:26 pm

Gun Freak, the white part is simply to keep the 1" steel washers from digging into the copper walls. It simply keeps the piston centered better. Other than that I can't tell what else is complicated?

I really don't see how much easier a blowgun would make things, but I guess I could dig one up and give it a whirl, although I already had one on there and was less than impressed.

Thanks for the suggestions.
User avatar
Gun Freak
Lieutenant 5
Lieutenant 5
Posts: 4971
Joined: Mon Jan 25, 2010 4:38 pm
Location: Florida
Been thanked: 8 times

Wed Mar 09, 2011 8:37 pm

The rubber behind the piston face, the teflon tape on the groove, extra washers. I'm not nagging, just think it could be simpler without all the extracurricular activities, like mine :wink:
OG Anti-Hybrid
One man's trash is a true Spudder's treasure!
Golf Ball Cannon "Superna"M16 BBMGPengunHammer Valve Airsoft SniperHigh Pressure .22 Coax
Holy Shat!
User avatar
mark.f
Sergeant Major 4
Sergeant Major 4
Eritrea
Posts: 3638
Joined: Sat May 06, 2006 11:18 am
Location: The Big Steezy
Has thanked: 58 times
Been thanked: 58 times
Contact:

Donating Members

Wed Mar 09, 2011 8:49 pm

In order: :D
The rubber behind the piston face is simply to reduce leaks through the nuts and washers and out the barrel. I've always had problems with these leaks on my bolt pistons. There is also teflon tape wrapped under the nuts and washers holding the sealing face on.

The teflon tape in the groove is simply because the groove is too deep. Since I had to use what could be got at Ace Hardware, the closest I could come up with is a 1/4"x1" fender washer sandwiching four 1/4" regular washers (3/4" OD). This created a 1/8" deep groove, but the copper pipe is larger than 1" in ID, so some teflon tape made up the difference. I've done this many times on homemade o-ring grooves, because they're, well, homemade. :) To create the air passage for the floating type o-ring, I simply hacked a slit into the forward two 3/4" OD washers and simply cut the 1" OD washer from edge to center. This took about 5 minutes with a hacksaw. Keep the slits lined up with an old razor blade when tightening and Robert's your mother's brother, you've got a blind hole without a drill bit. :roll:

The extra washers are simply because the nylon washers used to form the bulk of the piston are not for 1/4" bolts, so the nuts wouldn't clamp them by themselves.

The extra nuts serve to lock the different portions of the piston in place so I don't wind up having to adjust them anytime soon.


There are also things you can't see. :lol: For instance, since the nylon washers aren't meant for 1/4" bolts, the 1/4" allthread was wrapped with electrical tape until it matched the inside diameter of them and them trimmed so that it sat flush under the washers. This was done on all of the hardware except for the forward portion of the piston (where I used teflon tape to do the same thing and also aid in sealing). The result is a piston as close to a true cylinder as possible with ordinary zinc, plastic, and rubber hardware, and a reliable seal with the barrel port.


I know that's a lot to read, but it should answer your question. :P

EDIT: bolts aren't nuts, kids.
Last edited by mark.f on Wed Mar 09, 2011 10:04 pm, edited 1 time in total.
User avatar
Gaderelguitarist
Corporal
Corporal
Posts: 580
Joined: Sat Aug 16, 2008 9:56 pm
Location: Columbia, MD
Contact:

Wed Mar 09, 2011 9:58 pm

It's ok, Mark. I like your piston. :D

And I also forgot to compliment the simplicity of your stock. It looks comfortable.
so many muchness
User avatar
mark.f
Sergeant Major 4
Sergeant Major 4
Eritrea
Posts: 3638
Joined: Sat May 06, 2006 11:18 am
Location: The Big Steezy
Has thanked: 58 times
Been thanked: 58 times
Contact:

Donating Members

Wed Mar 09, 2011 10:03 pm

It could actually be an inch longer, but I wasn't going to get a 9" pipe nipple threaded. :roll: Even so it's pretty comfortable.
User avatar
Gaderelguitarist
Corporal
Corporal
Posts: 580
Joined: Sat Aug 16, 2008 9:56 pm
Location: Columbia, MD
Contact:

Wed Mar 09, 2011 10:17 pm

I would probably end up with a 12" pipe on there. It's what I get for being vertically oriented. :roll:
so many muchness
User avatar
mark.f
Sergeant Major 4
Sergeant Major 4
Eritrea
Posts: 3638
Joined: Sat May 06, 2006 11:18 am
Location: The Big Steezy
Has thanked: 58 times
Been thanked: 58 times
Contact:

Donating Members

Wed Mar 09, 2011 10:29 pm

I originally slapped a 18" nipple on there. Even though I could reach the pilot it was really awkward to hold, so I got out the measuring tape and tried again.

EDIT: forgot to ask, Gun Freak, what is that piston for? WIP?
User avatar
mark.f
Sergeant Major 4
Sergeant Major 4
Eritrea
Posts: 3638
Joined: Sat May 06, 2006 11:18 am
Location: The Big Steezy
Has thanked: 58 times
Been thanked: 58 times
Contact:

Donating Members

Thu Mar 10, 2011 7:45 am

UPDATE: After some playing around, I've discovered that my piston head leaks past 200 PSI on the compression stroke. This is probably from the type of seal used, which is far from ideal, and I believe I'll replace them with good ol' o-rings sometime today.

Also, I might consider cutting down the chamber to make filling to 400+ PSI pressures bearable, but I need to do some playing around in GGDT.

Oh yeah, and the HPA setup went out the window, as an entry level 47CI 3KPSI tank would only fill this gun a total of six times as it is. :roll:

EDIT: DEFINITELY cutting down the chamber. My rudimentary calculations show that an 18" length chamber (plus the extra volume in the elbows) would only take around 63 pumps to fill to 400 PSI, as opposed to 130 for the current size, and will only decrease my velocity with a paintball to just over 1000 fps.
User avatar
Crna Legija
First Sergeant 2
First Sergeant 2
Posts: 2333
Joined: Sun Jul 20, 2008 5:14 am
Location: australia

Thu Mar 10, 2011 8:09 am

look for a fridge compressor, i fill my 1l fire extinguisher to 400psi in about 35-40 seconds.
'' To alcohol... The cause of, and solution to, all of life's problems.”
--Homer Simpson

Add me on ps3: wannafuk, 8/11/11 cant wait
User avatar
mark.f
Sergeant Major 4
Sergeant Major 4
Eritrea
Posts: 3638
Joined: Sat May 06, 2006 11:18 am
Location: The Big Steezy
Has thanked: 58 times
Been thanked: 58 times
Contact:

Donating Members

Thu Mar 10, 2011 8:27 am

I'm actually continually on the lookout for one. I found one off of PR-33 near where I live (where people dump loads of junk) but I'd need a canoe to get to it with all of these "spring showers" (plus it probably doesn't work).

In either case, I believe cutting down the chamber is a good idea. It should help with the noise a little as well. Even at only 120-160 PSI, the report is pretty loud (I know you can't tell by the videos). With an 18"L chamber the C:B ratio would be about 0.7 (counting the volume of the elbows, again).
Post Reply