I made this post on the Spudtech forum to explain how to use a check valve in a combustion gun for venting without it needing to hang off the back of a chamber, with no need for epoxy or screws, and if needed is easily replacable. This is the one I use on the <a href="
http://www.spudfiles.com/forums/viewtop ... 5&">Proton Pack</a> (CBPL).
You use this as an end cap and attach an air blower (air mattress inflator). It will vent a chamber in about 3 seconds.
What I bought was a 4" female adapter, a 4x2" bushing, 2 2x1.5" bushings, 1.5" threaded sump pump check valve (found over by the sprinkler valves), and a 1.5"x3/4" bushing.
Take the 4x2 bushing and dremel out the stopper ring and glue the 2x1.5" busing INSIDE the 4x2" bushing,the other 2x1.5" bushing on the outside, and the 2x3/4" bushing into the OUTSIDE 2"x1.5" bushing. (My air blower needed this size bushing with a small length of 3/4" pipe inside the bushing to fit my blower nozzle. Other blowers may need different sizes combined with some piece of hose or pipe, whatever makes it fit. It doesn't need to hold any pressure so don't be reluctant to use duct tape if you have to.) A small chunk (about 1.5 inches) of 1.5" pipe is glued into the 1.5" socket on the INSIDE of the 4x2" bushing and then has the 1.5" female adapter glued to that. That assembly is then glued into the 4" male adapter.
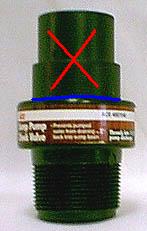
To prepare the sump pump valve take a hack saw to the indicated mark (blue line) on the picture of the valve below. (You could actually go even lower if you want.) This is not neccessary but really makes it look better and gives more space in the chamber. After it is cut you can twist it into the 1.5" threaded adapter.
<img src="
http://www.spudfiles.com/uploader/uploa ... .jpg"><img src="
http://www.spudfiles.com/uploader/uploa ... 2.jpg"><br>
<img src="
http://www.spudfiles.com/uploader/uploa ... .jpg"><img src="
http://www.spudfiles.com/uploader/uploa ... check4.JPG">
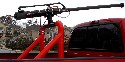
Upon curing this entire endcap is used instead of a regular cap. It is a bit more bulky but should never need to be removed unless in a case of emergency chamber repair (or an impromptu photo shoot...hah). It is much more pleasing to see than some other check valve assemblies I've seen, requires no screws/ epoxy/ multi-plastic bonding glue, and allows replacement of the valve for whatever reason may come up.


